12 tricks to become a photoshop master
1. Find an Expert to Follow Regardless of what field you're in, following and learning from an expert can be incredibly beneficial, ...
https://photoshoptricks365.blogspot.com/2019/02/12-tricks-to-become-photoshop-master.html
1. Find an Expert to Follow
Regardless of what field you're in, following and learning from an expert can be incredibly beneficial, and graphic design is no different. If you hope to become a standout designer, why not find someone that you admire and pay close attention to their career and their work? Fortunately, being in a field that is often closely related to technology, it's easy to find experts online and get exposure to their work, read their blog, and read interviews with them.
Psdtuts+ frequently publishes informative interviews with accomplished designers. These interviews provide insight into their lives and their careers that may help you some way in your own work. If you already have someone in particular that you admire, subscribe to their blog if they have one, find them on social networking sites, keep and eye on their portfolio, and just generally keep tabs on their career.
If you don't have anyone in mind at this point, pay attention to work that you like in Flickr groups that you visit, see what stands out to you at design galleries, or find a particular tutorial writer that has a style which you appreciate. In some cases you may be able to get in touch with this person through their site or through profiles on networking sites, or you may choose to just quietly watch and learn from a distance.

Related posts:
+ Top 10 free and paid photoshop courses
+ Top 48 Photoshop tutorials ever
+ Top 30 photoshop mistakes
+ Top 10 free and paid photoshop courses
+ Top 48 Photoshop tutorials ever
+ Top 30 photoshop mistakes
2. Use Different Workspaces for Different Types of Tasks
Specific tasks require specific workspaces. Using one and the same workspace for every task you perform is simply not productive. Professional photographers have many different lenses and filters for use in different situations. They might still get the job done shooting with just one lens but the quality of the final result will suffer.
In the case of Photoshop, the quality may well be the same, but the amount of time spent by you will be way much longer.
Instead of re-designing your workspace every time you switch to a different task or project, it's far better to create your own specific task-oriented workspaces to use when needed.
Photoshop provides several default workspaces, such as Painting, Photography, and Typography. They are good for a quick start, but customizing workspaces to fit your personal and project needs can further improve and speed up your workflow.
A productive workspace should have all tools and panels you are likely to use while working on a particular task. All unnecessary or distracting stuff should be removed.
For example, if you design a lot of text-heavy illustrations, you would need the Character and Paragraph panels, but you’re far less likely to need the Histogram panel. Here is an example of a workspace fine-tuned for text editing:
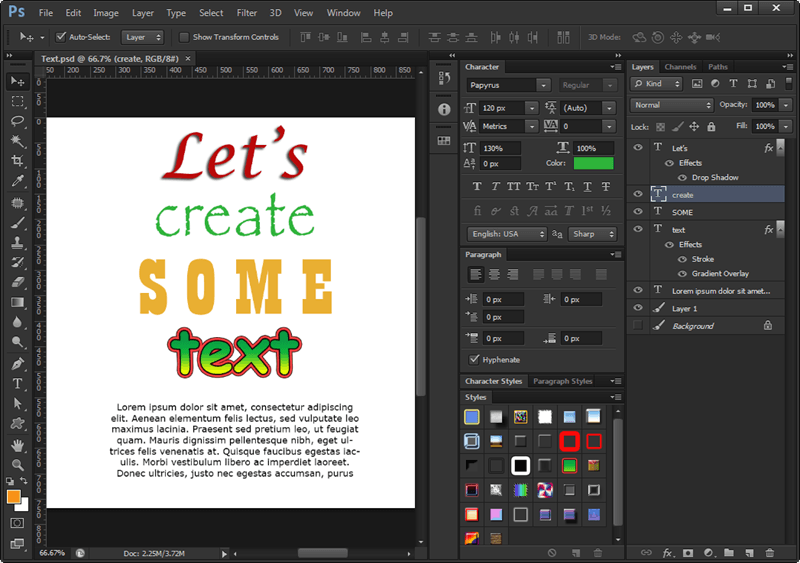
The Typography Workspace prioritizes type oriented tools and panels.
3. Customize Photoshop’s Default Menus
In his 2004 book “The Paradox of Choice”, Barry Schwartz shows us how having too many 'choices' becomes debilitating–even paralyzing–to shoppers. A similar effect applies to Photoshop users.
Customizing Photoshop’s default menus may not seems a big deal, but if your aim is maximum performance and usability you should do it. There are hundreds of options in the menus and it costs time to navigate through them.
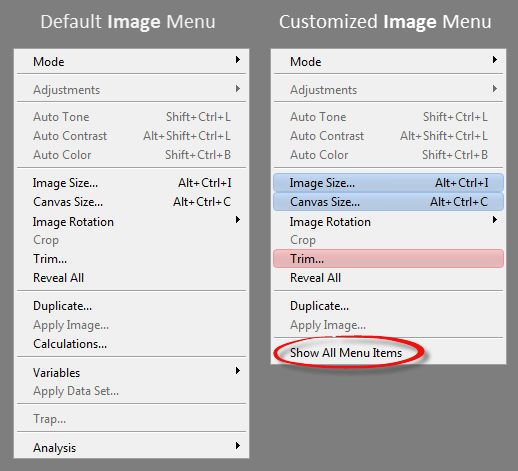
So, if you don’t want or need to see certain menu items for particular workspace, you can turn their visibility off, thus making the menus more compact.
For quicker navigation you can also highlight certain menu items with specific color. A colored menu item is far easier to spot, rather than a regular one.
4. Get the Habit to Name and Organize Your Layers Properly
Layers are the "soul" of Photoshop and every other graphics editor–in fact it's hard to imagine the product without layers. As such it's important to master good layer management.
We've all had that friend who allows hundreds of files to accumulate on their desktop. Don't be that guy with Photoshop layers, and instead get into the habit of naming and organizing files as soon as you create them.
Even with Photoshop's improved layers searching capability don't get you off the hook. The searching and filtering options only work if your layers are sensibly named and organized.
You can think of layers panel as a tree representing a file system. Layers are files, and layer groups are folders. To keep everything in order, group related layers, thus making easier to find and manage them.
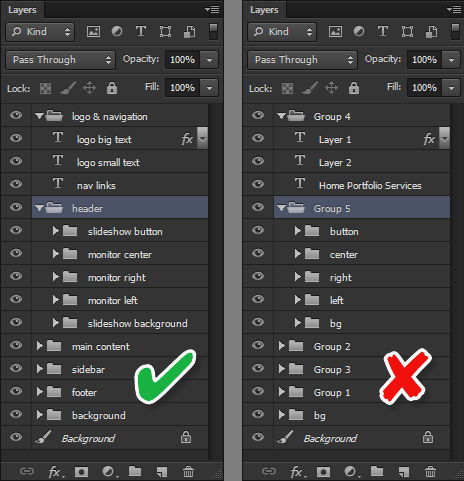
Also always give meaningful names to both layers and layer groups. Unless you have mind-readers as work colleagues, no-one else will be able to guess what 'Layer 1' or 'Group 3' means.
For example, when designing a website, you can put its different sections, such as 'header', 'sidebar', 'footer', and so on, in their own layer group. This allows for quick navigation between the website sections and gives you control over all layers within a particular group at once.
When you select a group you can manipulate all containing layers as one unit. Layer groups can also be nested which further facilitate their management.
5. Versioning Your Files with Layer Comps
A 'Layer Comp' is a snapshot of the current state of the Layers panel. Layer comps allow you to maintain multiple "versions" of your document in a single file. This is perfectly suited for managing alternative layouts of your design or in every situation where different states are involved.
For example, if your design have two themes, dark and light, you can take snapshots for both of them. Thus you can easily preview them and export two completely different files without extra work.
This graphic shows the same design project with two different ‘Layer Comps’
As you can see, swapping between the two versions of this file is an one-click operation.
6. Always Work in a Nondestructive Way
Making mistakes is a part of our nature. We just need to ensure our mistakes are recoverable.
Working in a nondestructive way allows us to make changes to images while keeping the original image data intact. Thus, we can do the most venturous experiments without worrying about damaging the original image.
The two the most significant ways to perform nondestructive editing involve the use of:
- Adjustment Layers. Adjustment layers allow you to use as many adjustments as you wish without actually applying them to the original image. They work as a preview of the final result. If you don't like it just go back and change it again until you're completely satisfied. It's that easy.
- Smart Objects. A Smart Object keeps the source data safe and provides you with a representation of the image to work with. It can be freely modified without ever losing the original image data.
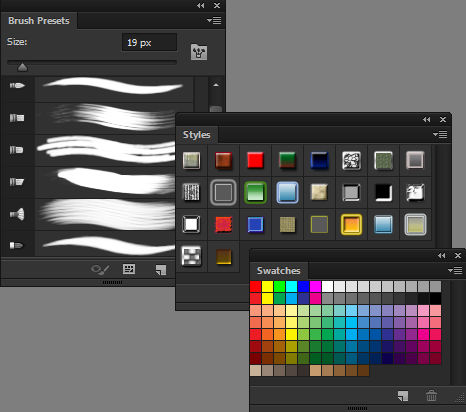
7. Make Use of Photoshop Presets
Photoshop offers many types of presets you can use to save time by following the DRY principle. Take the time to set something up the right way the first time, then reap the rewards going forward.
Here are the most important of them:
- Document Presets. If you end up creating one and the same type of document over and over again, for example, a website design or a logo, you can save its generic settings as a preset. Thus, there won't be needed to specify them manually each time when you start a new project.
- Tool and Brush Presets. If you spend the time to set particular tool's options, then saving them as presets is a good idea. Otherwise you'll need to set them every single time, when you need to use the tool with the same options.
- Swatches. Choosing the right colors (for logo, brand, etc.) can be a time consuming process and once you end up with the right ones, you can do yourself a big favor by saving them as a library of color swatches in the Swatches panel. This is particularly useful for company colors and corporate style guides.
- Styles. Often when you create buttons or similar components in Photoshop, you take advantage of layer styles. A button may contain a subtle drop shadow, a gradient overlay, a stroke, and so on. We're all familiar with the advantages stating a class once in CSS and re-using it many times. Use the same approach with layer styles. For that reason you should save the combination of applied effects as a new style in the Styles panel, giving your designs a consistent look and feel and making the future use of it a breeze.
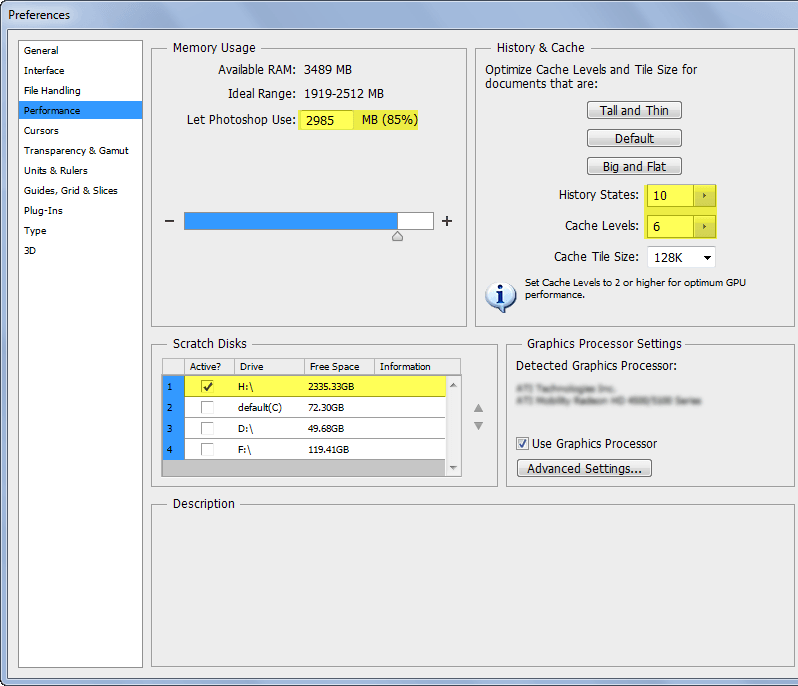
8. Tweak Your Preferences for Maximum Performance and Usability
Taking ownership of Photoshop's preferences is a boring but indispensable job if you plan to use the program optimally. Photoshop demands an enormous amount of computer resources, especially when working on large documents or you have opened multiple files.
If the program is poorly optimized, your workflow will be drastically slowed down. In contrast, properly set Photoshop preferences lead to faster performance, which means that you'll accomplish your tasks with a greater speed and less headache.
Let's see what the most crucial performance preferences are and how to adjust them:
- Reduce the number of History States. History States designate for how many undos are available. Having many undo states might be good for you but it slow down the application performance. Increasing the number of History States means Photoshop uses bigger amount of RAM to manage the History panel.
- Tweak the number of Cache Levels. Image caching helps Photoshop to redraw heavy, high-resolution images faster. It uses low-resolution versions of images to update the image more quickly. When you're working on high-resolution images or large documents, more Cache Levels (6 is good) will speed up the redraw process. On the other hand, when you're working on smaller documents you might need lowering the Cache Levels (2 is good), thus freeing more RAM and making Photoshop operates faster.
- Set the proper Scratch Disks. I already told you that Photoshop is a resources eating beast. It uses not only the available RAM but also the free space on any available hard drive referred to as a Scratch Disk. By default Photoshop uses your primary hard drive as a scratch disk. But if you have additional drives you can use them instead. This will prevent damaging your boot drive and will increase the processing speed of Photoshop. For the best results, you should select a hard drive different from the one containing the image file you're working on and with plenty of free space.
- Give Photoshop more RAM to operate on. Photoshop's favorite meal is RAM and its main motto: "The more RAM, the better." You can satisfy these Photoshop needs by increasing the amount of RAM the application is allowed to use. If you don't use too many programs opened you can safely set higher value (for example, 85%). But if you use Photoshop along with other applications (browser, word processor, Skype, etc.) make sure there is enough memory for them too. After all they are also hungry.
To insure that all of the above settings have taken affect you must restart Photoshop.
 The performance is the first thing you should improve but there are also many usability preferences, which you can tweak to make using the program more comfortable. Bear in mind that not everyone agrees with the same usability settings, so you'll need to customize them to satisfy your own taste. This will make your workflow smoother and enjoyable.
9. Try to Replicate the Work of Others
One proven way to learn is to attempt to replicate the work of other designers. I'm not suggesting that you rip off other designers by selling this work or taking credit for it as your own (which unfortunately is all too common, especially online). What I am suggesting is that in your own experimental work that is meant just for learning purposes, take an exemplary piece from another designer and do your best to duplicate it. If it's just used for your own educational purposes and not sold or re-distributed it is perfectly acceptable. Also, unless you change and personalize this design dramatically, do avoid placing it in your portfolio.
In my own effort to learn web design I used to start with a finished product from another designer and attempt to achieve the same layout or some other aspect of the design. This was a valuable learning experience that helped to see how I could accomplish things that worked in real world scenarios. The same thing can be done regardless of what kind of design you're working on. For example, find a few album cover designs that you like and attempt to re-create them.
By doing this you're working towards the goal of creating a design that already has proven to be successful as a finished product. In addition to hopefully learning some new techniques in Photoshop, you'll also pick up some general principles of good design that can be carried over to any work that you do.

10. Participate in Groups and Get Feedback
After you've learned by following tutorials and you've done some experimentation on your own, it can be helpful to get feedback and constructive criticism from other designers. There are groups of graphic designers all over the place that can be excellent sources of feedback. Psdtuts+ has its own Flickr groupfor this purpose and a number of other design blogs have their own groups as well. Additionally, there are hundreds of Flickr groups for designers that are not associated with a specific blog or website.
The Psdtuts+ Flickr group is very active with over 11,000 items and 4,000 members. Groups like this are great places to share your work with other designers who are also interested in improving their own skills. You can get involved by providing feedback to others on their work, and you'll likely get more of a response on your own work. If you're interested in a place where you can comfortably share your experimental work to continue the learning process, try some Flickr groups.
Other Flickr groups worth checking out include Abduzeedo, Go Media, Fuel Your Creativity, My Ink Blog, and Design Shard.

11. Blog about Photoshop or Design
If you're attempting to improve your abilities with Photoshop, blogging on the subject will help you to stay active in your pursuits and it will force you to keep learning. Working on the content for your blog will be an excellent educational experience. Not all blogs are run by experts on the subject, in fact most probably are not. Many blog readers enjoy following a blogger who is truly developing along the way, and many of your readers will be going through similar situations in their own learning.
Once your skills have developed to a certain point you may also want to look into the opportunities available to write for other design blogs. Many of the larger blogs pay writers for their work, and blogs of all sizes are open to free guest posts in exchange for a link back to your own blog. While writing for your own blog will allow you the freedom to work on developing any skills that you like, writing for others will push you in other ways. In most cases, if you're being paid for your posts, it is going to have to be quality work in order to get published. This means that you'll need to keep stretching yourself and learning new things in order to develop the content. It can be difficult to write for other blogs, but it's a tremendous growth opportunity if you're willing to put in the work.
Psdtuts+ accepts unsolicited article/tutorial submissions, and a number of other sites are also actively looking for writers. Other websites and blogs that are looking for graphic design content include GoMediaZine, CreativePro, and SitePoint.

12. Saving and Exporting to Different File Formats
The last thing you want is to lose all your work at a vital moment! Make sure to frequently save your work in the PSD format so you will have access to your layers when reopening the file.
It’s vital to learn about the different file formats and how to save them correctly before using Photoshop. The most commonly requested file formats are JPEG, PNG and TIFF.
JPEG which stands for Joint Photographic Experts Group is mostly widely used for saving photographs and graphics. The file format is designed specifically for compressing the image and can include metadata which describes the dimensions of the image and file size.
The TIFF (Tagged Image File Format) is used if you want to save the image as a raster graphic. Raster graphics are widely used by graphic designers and publishers due to their high resolution which is used for print.
PNG stands for Portable Network Graphics and enables you to save files with a transparent background. The format uses lossless compression and is also a raster graphic file, making it very popular if you want to save files for both web and print.
More information about these file formats can be found on techtarget.com.


